1.20.2013

Sisterly Love: Old Navy Clearance Shopping

 Yesterday we had a great surprise--my sister and her family came up for an impromptu visit! It was so nice to see them without being rushed. We all enjoyed lunch at 5 Guys (the best burger around!), then Maranda and I shopped while the boys spent the afternoon with the kids at our house. We finished the day with dinner at our favorite local Italian restaurant, Joe's. 

We decided to browse Old Navy even though we both feel like it is very hit or miss, and their hits are often overpriced if not on sale. Yesterday we found several hits...on clearance! I was afraid I wouldn't get enough wear out of these green skinnies to justify purchasing them, but my sister talked me into it. I'm already glad I took her advice.

 
 Outfit breakdown: Navy blazer from Goodwill ($4), striped navy top from Old Navy ($8.99), green skinnies from Old Navy ($11.99), white bauble necklace from Ebay ($5).

We also spent two solid hours in Ulta. Why is it so fun to look at beauty and hair products? I used to be afraid to try new products because I often felt duped when the product didn't perform and my money was gone. But then I discovered that Ulta and Sephora have fantastic return policies. I now have no fear of buying new products because I know I can return anything that doesn't work after I've tried it at home. 

I got a new volumizing mousse, a two in one base/top coat, and this stunning glittery raspberry nail polish. Zoya is my favorite polish brand, but it doesn't really stay well for my sister. She prefers Essie. I think nail polish is like all other beauty products--it may work great on someone else, but you have to find what works best on you with your chemical makeup. 
Yesterday was lots of fun, and I hope we get to do it again soon. Today was a great service at church and now we are relaxing at home. I hope everyone had a great weekend!
Photobucket

1.16.2013

DIY Boot Socks


Emily from The Sweetest Thing rocks a boot sock regularly and even put together a great "Boot Sock 101" post that you must check out! She inspired me to create some DIY boot socks on the ultimate budget--$3.50 at Goodwill.

My favorite style boot sock style is neutral and feminine. Like these:

The Lacey Lou-Natural: Open-work Legwarmers with Ivory knit Lace trim & buttons (item no. 3-14)

But they are $34.00...and I just can't spend that kind of money on socks. Especially "socks" that don't even keep my feet warm.

I set off for Goodwill with hopes of finding a sweater that could be made into some DIY boot socks. I scored with a $3.50 find. Here are the details:


Tips: Add lace, buttons, etc. to the top. The sleeves may not be long enough for them to go all the way to your ankles, depending on the height of your boots. Dont' worry, just pull up your boot socks to the height you need because no one will see!

P.S.: You can probably use regular cotton thread if you don't have or can't find elastic thread. You will just need to be really careful when you slip your socks on because cotton thread won't have any stretch in it. If you pull it too much, it will snap and your hem will fall out, which could lead to the fabric raveling.

If you make your own boot socks from a sweater, I'd love to see your pics! Just post a link in the comments.

Photobucket

1.12.2013

DIY T-Shirt Quilt {Part 3}

The introduction explains the necessary materials and cost breakdown. You cut all your pieces in Part 1, and you sewed your quilt top together in Part 2. Let's finish your quilt!

1) Clear off enough floor space for your quilt backing fabric (or a tabletop if your quilt will fit). Your backing fabric should be a couple of inches bigger than your actual quilt on every side. Put down your backing fabric RIGHT SIDE FACING THE FLOOR and wrong side facing the ceiling. The part of the fabric that you want to see and feel on the back of the quilt when you turn it over is the "right side" and it should be facing the floor! You will see a seam down the middle of my backing because one cut of fabric was not wide enough. If you need to do this too, just place your backing fabrics right sides together, pin, sew, and trim the seam to cut out the bulk.
IMG_0463

2) Smooth out your backing fabric so it is flat and there are no wrinkles. Tape it all around (every few inches) to the floor so it doesn't move! I used Scotch tape because it's all I had. Painters tap or masking tape might work better. This is also a good time to use a lint roller to pick off any strings or other things on your fabric that you don't want permanently sealed in your quilt sandwich.
IMG_0465

3) Place your batting on top of your backing fabric. Smooth it out and tape it the same way you did your backing fabric. (FYI, I used this low loft Polly-Fill batting from Hobby Lobby with a 40% off coupon.)
IMG_0466 


4) Place your quilt top on top of your backing fabric and batting. Smooth it out. Try to make sure your seams on the back are flat (like you ironed them). Your quilt top should be smaller than your backing and batting. This allows you  to have some freedom in aligning the three layers. Again, remember that your t-shirt quilt fabric is delicate and is prone to stretching, so it's shape may change a little as it is handled and moved around.
IMG_0468

5) Use pins and/or safety pins all over to join all three layers together. You already have pins around all the quilt top edges, so just use those same pins for that part. At a minimum, put one pin in the center of every individual t-shirt. Also, at a minimum, put pins about two inches to the left and two inches to the right of every place that four shirts intersect. I recommend starting your pinning from the center and working your way out as this will allow you to smooth out any remaining wrinkles.
IMG_0471 


6) Get your scissors, a hand sewing needle with a large eye, and two skeins of embroidery thread. You want to use embroidery thread because it is actually six pieces of regular thread joined together.
IMG_0473

7) Cut your embroidery thread into 12" lengths. You will need one 12" piece for every intersection of four shirts. My quilt had 35 intersections. You can get about 20-25 12" pieces per skein.
IMG_0476

8) Thread your needle with one 12" piece of embroidery thread. Pull the thread through so that the ends align and the needle is in the center. Do not tie a knot at the end of your thread.
IMG_0481

9) Note that this four shirt intersection is not perfectly aligned. That's just fine because you won't be able to tell in just a moment. Put your needle down where it will best hide the "off" alignment on the right.
IMG_0482

10) Pull the needle back through from the bottom. It should come out where it will be hide the "off" alignment on the left. (To reach around to the back and push the needle back through to the top, you will need to remove the edge tape--that's fine because all the pins are now holding the layers together.)
IMG_0484 


11) Pull the needle through until half the thread is on the right and half is on the left. Cut the thread on the left just above the needle and set your needle aside. Tie the left side and right side together in a double knot. Repeat at every intersection. (This video uses a slightly different tying approach, but it might be helpful to watch.)
IMG_0486

12) Trim the excess backing and batting fabric.
IMG_0487

13) Use the following video (not mine, but it's what I follow) to attach your binding to the quilt. The video says to sew a .25" seam, but I want my binding to match the rest of my seams, which are .5". I cut my binding strips 3" wide to allow for this. I sew about a 3/8" seam. I'd suggest practicing on some scrap fabric to figure out exactly where your needle should go to get the width you want.


14) Your quilt is huge and this is what it will look like while you sew on the binding! A good tip is moving your ironing board to your sewing machine and using it to support some of the quilt's weight.
IMG_0488


15) Go slowly! I like to pin as I go. Watch out for the pins on the edges holding your layers together! Don't sew through those--remove before your needle gets to them.
IMG_0489

16) Once your binding is sewn on, trim any threads that are hanging off the binding or any backing fabric/batting that wasn't trimmed close enough before.

IMG_0491

17) Use pins or hair clips to fold your binding back and prepare it for hand sewing. I like to do the hand sewing while watching TV with the blanket in my lap. When I do this and use pins, they poke my legs the whole time! They will work, but if you use hair clips, they won't poke you.

IMG_0492
IMG_0493

18) Get comfortable and hand sew the binding down on the back. The front should now look like this:

19) Take pictures of your awesome t-shirt quilt, post them, and leave a link in the comments so I can see your work!


Photobucket

1.11.2013

DIY T-Shirt Quilt {Part 2}

Be sure to read the introduction and Part 1 before starting Part 2. To see bigger pictures than those below, click here.

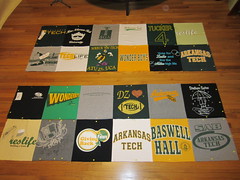
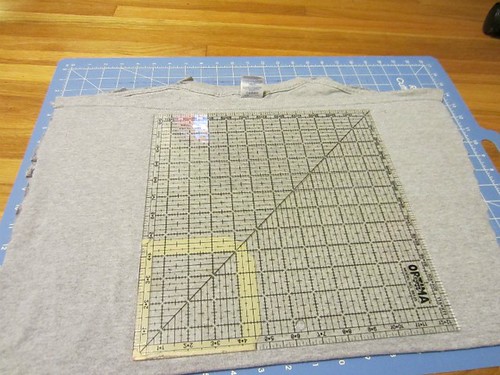
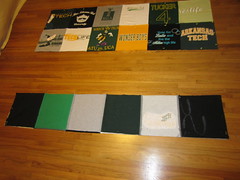
Now that you have all your pieces cut, it's time to sew!

There are several ways to do this, but I prefer cutting all my shirt squares then sewing them all. You could also cut two, sew them together, cut one, add it on, etc. If you have a helper, they could cut while you sew. Just find a method that works for you.

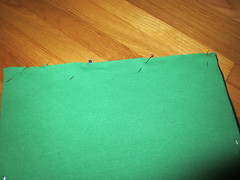
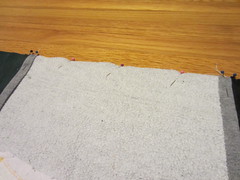
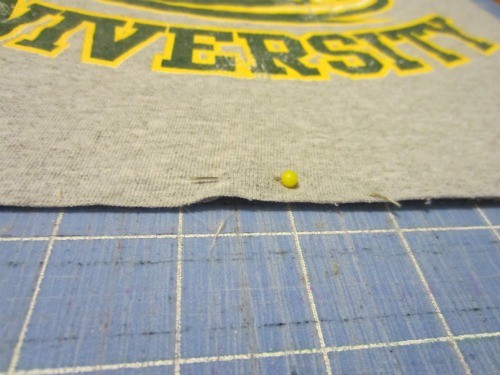
1) Take one of your squares that is an outside piece (nothing will be sewn to its left ). Put pins on its top, bottom, and left side. This helps make sure the square keeps its shape while you are sewing it. Remember that your fabric is delicate and its shape can warp easily! Handle it very gently. You'll also see that I pinned a piece of paper to this square that tells me its row number. This helps make sure you don't get your design out of order.
IMG_0432

2) Take the square that goes to the right of the square you just pinned. Put a pins on the top and bottom of the new square.

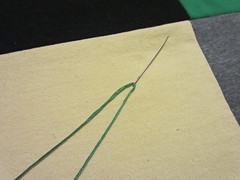
3) Place the edges that you want sewn together right sides together
IMG_0433

4) Line up the edges and place pins along where you want to sew.
IMG_0434

5) Take the square that goes to the right of the last square and also place pins on its top and bottom. Then line up the edges you want sewn together right sides together, and pin. Repeat this until your entire row is pinned together. Be sure to add side pins to the square that is the last one on the right (that will not have another square added to its right).

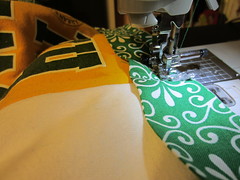
6) Sew a .5" seam along all the edges you want sewn together, removing the pins before your sewing needle gets to them.

7) Now your first row is sewn! (Note that the gray square in this picture is actually a sweatshirt, so it is only one layer thick. That is why there are not top and bottom pins holding together layers of shirts--if you are using shirts, make sure your tops and bottoms are pinned!)
IMG_0436

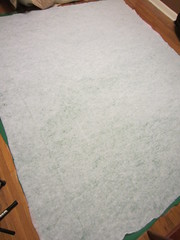
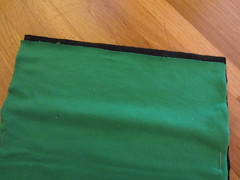
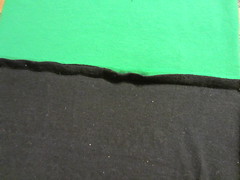
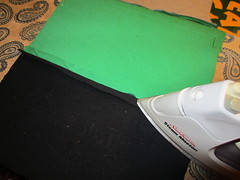
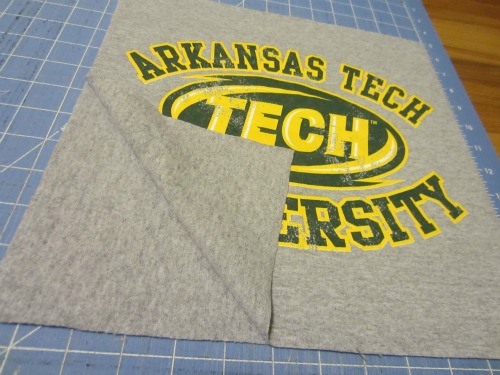
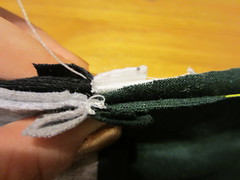
8) Place your row on an ironing board. See how your seam is sticking up? That will make your quilt top look bulky and feel funny--we don't want that.
IMG_0437

9) Separate the seam--two layers on one side, two layers on the other side. Iron it flat. TIP: Watch out for screen prints! They will melt all over your iron. If you have to iron over a screen printed graphic, place a rag or old shirt over it and iron on top of that.
IMG_0438

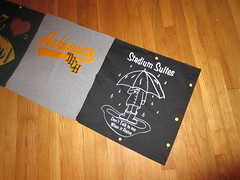
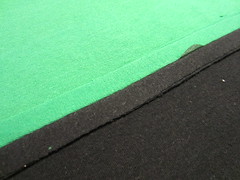
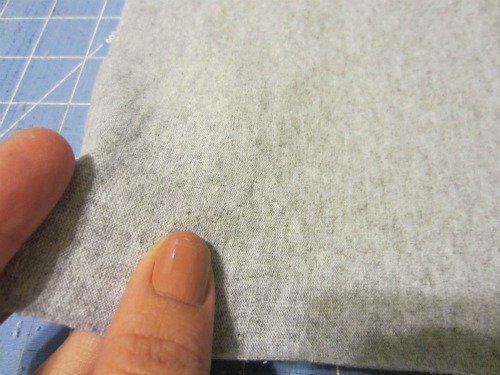
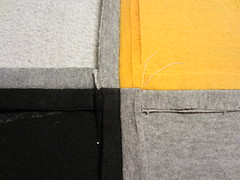
10) Now you have a beautiful flat seam. Repeat for every seam on your row.
IMG_0440

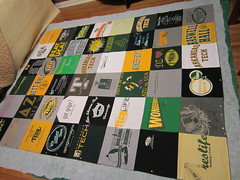
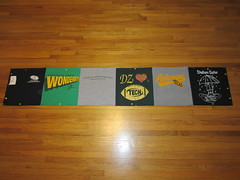
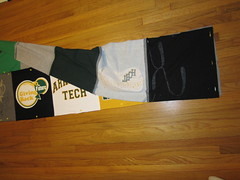
11) This is what your row will look like after its sewn and ironed. Set this aside. Repeat all the above steps for all your rows.
IMG_0441

12) Time to sew your rows to one another!
IMG_0447

13) To start out, figure out which row edges you want to be sewn together. Then turn one of those rows down so they are now right sides together.
IMG_0448
IMG_0450

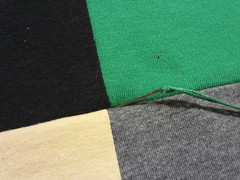
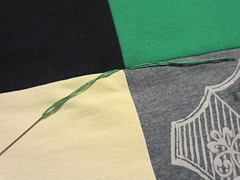
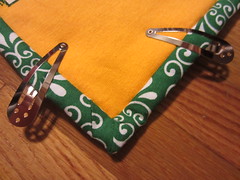
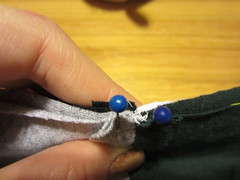
14) Line up the seams where your squares come together. It is very important to line all these up first instead of just pinning from one end to the other! Remember your fabric might have stretched or warped its shape along the way. Lining up the seams of your squares will give you the cleanest and straightest line. Also be sure that when you sew over these areas that they continue to lay in the direction shown in the picture (you want them to stay flat like you ironed them).
IMG_0451

15) Put a pin on each side of the center seam to hold the seams down flat and in line with one another.

IMG_0455

16) After you've pinned all the places where your seams join together to make a quad of four squares, pin the rest of the edges together. (You will need to take out the pins you placed there at the beginning to keep the layers together.) You might find that one shirt is a little longer than the shirt you want to pin it to. Don't worry! Play with your pin placement until the extra fabric is worked out. Use extra pins. You'll be surprised at how that extra fabric disappears.

IMG_0458

17) Sew these two rows together then put it on an ironing board. See those bulky seams again? Can't have that.
IMG_0461

18) Iron seam flat as you did before.

IMG_0462

19)
Repeat the above steps to sew a new set of two rows together. I recommend sewing groups of two rows together because it lessens the bulk you are dealing with at your sewing machine. Once every row is sewn
to one other row, sew them into groups of four rows. Last, sew your two
groups of four rows together
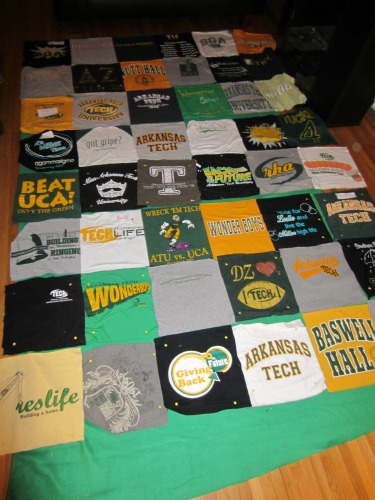
. Now all eight rows are sewn together and your entire quilt top is complete! Keep the outside edge pins in place because you're about to use them.

You are now ready for Part 3, which explains making your quilt sandwich, tying your quilt, and binding it. You're almost finished!

Photobucket

1.10.2013

DIY T-Shirt Quilt {Part 1}

Before we get started, be sure to read the introduction and materials/cost breakdown for your t-shirt quilt.

So you've decided to make a t-shirt quilt? Great! Let's prep your fabrics.

1) Gather your t-shirts. If there is a design on the front and back of the shirt, you'll want to cut each separately. To do that, just cut down the sides and over the shoulders of the shirt.

2) Once you've done that, or if there is not a design on the back, lay the shirt out flat on a cutting mat and position your template. I recommend a 12" plastic quilting square--it was big enough for almost every shirt design. When you line up the template, be sure to think about your seam allowance. I use a half inch seam allowance, which means that .5" around the square won't be visible on the final quilt. Make sure you can read any words that are important!


3) Use your rotary cutter around your template, and here is what you will have:


4) If you cut through two layers, you will have this:

5) Here is how I am able to get away without interfacing. Rotate the top shirt a quarter turn to the left or right and put it back on top of the bottom layer. Doing this makes the grains of the fabrics run in opposite directions. It gives the quilt square more strength, and it will stretch less when sewn (the whole point of interfacing). If you only cut one layer at a time (because there was another design on the back), grab an old shirt, cut it, and use it for the backing. Just make sure the grains go in opposite directions when you layer them. You will feel that one direction is tighter when you pull at it. So if the backing shirt is tightest from side to side, then lay your shirt with the design on top of that with its tightest feeling "pull" being up and down. I've found that the tightest feeling pull is up in down, in the same direction as most t-shirt designs, but always check to make sure! Be careful during this step because you don't want your fabrics to stretch out. Treat them delicately.


6) Put some pins in there to hold both layers together and set it aside. Do this again and again until all your shirts are cut and backed. Your hands will be sore the next day.

7) Clear a space and put down your backing fabric (this makes storing between steps much easier in the next step!). I like to use fleece because it's wide and very soft. Play with the placements of your shirt squares until you are happy with what you see. I wanted mine to look random, so I didn't put any of the same colors next to each other. I also spaced out the colors that felt like "anchors." In my case, those were the black, yellow, and white shirts. I'm not a quilting expert, so some people who are may be abhorred by my layout. I like it though :) This design is 6 shirts across by 8 shirts down, or 72"x96" before sewing.

8) Once you like the way it looks, get some some paper scraps and write "row 1," etc. on in and pin it to the first square on each row. This will help just in case something falls out of place. The reason I had you put down your backing is so you can easily roll up your design without risking getting your squares out of order!

9) Now you can easily store this until it's time to sew!

10) I also think it's good to go ahead and sew your binding strips. I like this tutorial, so I won't explain that here. Now you have this:

Phew! Still with me? I hope so! When you're ready, move on to Part 2 and Part 3.

Photobucket
09 10 11 12
Blogging tips