
The introduction explains the necessary materials and cost breakdown. You cut all your pieces in Part 1, and you sewed your quilt top together in Part 2. Let's finish your quilt!
1) Clear off enough floor space for your quilt backing fabric (or a tabletop if your quilt will fit). Your backing fabric should be a couple of inches bigger than your actual quilt on every side. Put down your backing fabric RIGHT SIDE FACING THE FLOOR and wrong side facing the ceiling. The part of the fabric that you want to see and feel on the back of the quilt when you turn it over is the "right side" and it should be facing the floor! You will see a seam down the middle of my backing because one cut of fabric was not wide enough. If you need to do this too, just place your backing fabrics right sides together, pin, sew, and trim the seam to cut out the bulk.

2) Smooth out your backing fabric so it is flat and there are no wrinkles. Tape it all around (every few inches) to the floor so it doesn't move! I used Scotch tape because it's all I had. Painters tap or masking tape might work better. This is also a good time to use a lint roller to pick off any strings or other things on your fabric that you don't want permanently sealed in your quilt sandwich.

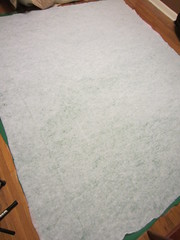
3) Place your batting on top of your backing fabric. Smooth it out and tape it the same way you did your backing fabric. (FYI, I used this low loft Polly-Fill batting from Hobby Lobby with a 40% off coupon.)
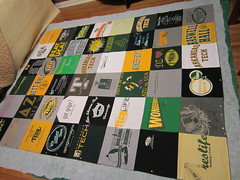
4) Place your quilt top on top of your backing fabric and batting. Smooth it out. Try to make sure your seams on the back are flat (like you ironed them). Your quilt top should be smaller than your backing and batting. This allows you to have some freedom in aligning the three layers. Again, remember that your t-shirt quilt fabric is delicate and is prone to stretching, so it's shape may change a little as it is handled and moved around.
5) Use pins and/or safety pins all over to join all three layers together. You already have pins around all the quilt top edges, so just use those same pins for that part. At a minimum, put one pin in the center of every individual t-shirt. Also, at a minimum, put pins about two inches to the left and two inches to the right of every place that four shirts intersect. I recommend starting your pinning from the center and working your way out as this will allow you to smooth out any remaining wrinkles.

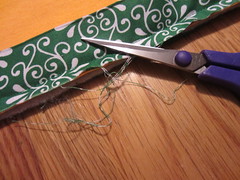
6) Get your scissors, a hand sewing needle with a large eye, and two skeins of embroidery thread. You want to use embroidery thread because it is actually six pieces of regular thread joined together.
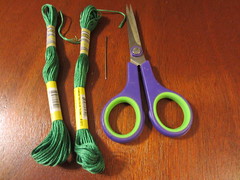
7) Cut your embroidery thread into 12" lengths. You will need one 12" piece for every intersection of four shirts. My quilt had 35 intersections. You can get about 20-25 12" pieces per skein.
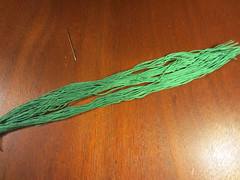
8) Thread your needle with one 12" piece of embroidery thread. Pull the thread through so that the ends align and the needle is in the center. Do not tie a knot at the end of your thread.
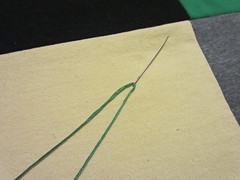
9) Note that this four shirt intersection is not perfectly aligned. That's just fine because you won't be able to tell in just a moment. Put your needle down where it will best hide the "off" alignment on the right.
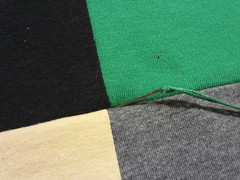
10) Pull the needle back through from the bottom. It should come out where it will be hide the "off" alignment on the left. (To reach around to the back and push the needle back through to the top, you will need to remove the edge tape--that's fine because all the pins are now holding the layers together.)
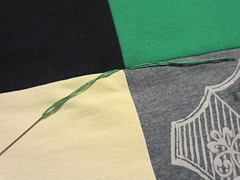
11) Pull the needle through until half the thread is on the right and half is on the left. Cut the thread on the left just above the needle and set your needle aside. Tie the left side and right side together in a double knot. Repeat at every intersection. (This video uses a slightly different tying approach, but it might be helpful to watch.)

12) Trim the excess backing and batting fabric.

13) Use the following video (not mine, but it's what I follow) to attach your binding to the quilt. The video says to sew a .25" seam, but I want my binding to match the rest of my seams, which are .5". I cut my binding strips 3" wide to allow for this. I sew about a 3/8" seam. I'd suggest practicing on some scrap fabric to figure out exactly where your needle should go to get the width you want.
15) Go slowly! I like to pin as I go. Watch out for the pins on the edges holding your layers together! Don't sew through those--remove before your needle gets to them.
16) Once your binding is sewn on, trim any threads that are hanging off the binding or any backing fabric/batting that wasn't trimmed close enough before.
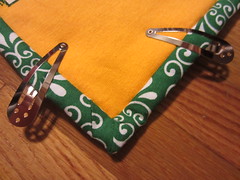
17) Use pins or hair clips to fold your binding back and prepare it for hand sewing. I like to do the hand sewing while watching TV with the blanket in my lap. When I do this and use pins, they poke my legs the whole time! They will work, but if you use hair clips, they won't poke you.

18) Get comfortable and hand sew the binding down on the back. The front should now look like this:
19) Take pictures of your awesome t-shirt quilt, post them, and leave a link in the comments so I can see your work!


1) Clear off enough floor space for your quilt backing fabric (or a tabletop if your quilt will fit). Your backing fabric should be a couple of inches bigger than your actual quilt on every side. Put down your backing fabric RIGHT SIDE FACING THE FLOOR and wrong side facing the ceiling. The part of the fabric that you want to see and feel on the back of the quilt when you turn it over is the "right side" and it should be facing the floor! You will see a seam down the middle of my backing because one cut of fabric was not wide enough. If you need to do this too, just place your backing fabrics right sides together, pin, sew, and trim the seam to cut out the bulk.
2) Smooth out your backing fabric so it is flat and there are no wrinkles. Tape it all around (every few inches) to the floor so it doesn't move! I used Scotch tape because it's all I had. Painters tap or masking tape might work better. This is also a good time to use a lint roller to pick off any strings or other things on your fabric that you don't want permanently sealed in your quilt sandwich.
3) Place your batting on top of your backing fabric. Smooth it out and tape it the same way you did your backing fabric. (FYI, I used this low loft Polly-Fill batting from Hobby Lobby with a 40% off coupon.)
4) Place your quilt top on top of your backing fabric and batting. Smooth it out. Try to make sure your seams on the back are flat (like you ironed them). Your quilt top should be smaller than your backing and batting. This allows you to have some freedom in aligning the three layers. Again, remember that your t-shirt quilt fabric is delicate and is prone to stretching, so it's shape may change a little as it is handled and moved around.
5) Use pins and/or safety pins all over to join all three layers together. You already have pins around all the quilt top edges, so just use those same pins for that part. At a minimum, put one pin in the center of every individual t-shirt. Also, at a minimum, put pins about two inches to the left and two inches to the right of every place that four shirts intersect. I recommend starting your pinning from the center and working your way out as this will allow you to smooth out any remaining wrinkles.
6) Get your scissors, a hand sewing needle with a large eye, and two skeins of embroidery thread. You want to use embroidery thread because it is actually six pieces of regular thread joined together.
7) Cut your embroidery thread into 12" lengths. You will need one 12" piece for every intersection of four shirts. My quilt had 35 intersections. You can get about 20-25 12" pieces per skein.
8) Thread your needle with one 12" piece of embroidery thread. Pull the thread through so that the ends align and the needle is in the center. Do not tie a knot at the end of your thread.
9) Note that this four shirt intersection is not perfectly aligned. That's just fine because you won't be able to tell in just a moment. Put your needle down where it will best hide the "off" alignment on the right.
10) Pull the needle back through from the bottom. It should come out where it will be hide the "off" alignment on the left. (To reach around to the back and push the needle back through to the top, you will need to remove the edge tape--that's fine because all the pins are now holding the layers together.)
11) Pull the needle through until half the thread is on the right and half is on the left. Cut the thread on the left just above the needle and set your needle aside. Tie the left side and right side together in a double knot. Repeat at every intersection. (This video uses a slightly different tying approach, but it might be helpful to watch.)
12) Trim the excess backing and batting fabric.
13) Use the following video (not mine, but it's what I follow) to attach your binding to the quilt. The video says to sew a .25" seam, but I want my binding to match the rest of my seams, which are .5". I cut my binding strips 3" wide to allow for this. I sew about a 3/8" seam. I'd suggest practicing on some scrap fabric to figure out exactly where your needle should go to get the width you want.
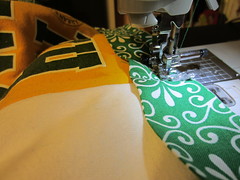
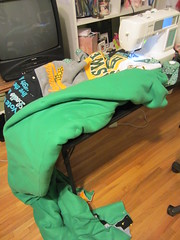
14) Your quilt is huge and this is what it will look like while you sew on the binding! A good tip is moving your ironing board to your sewing machine and using it to support some of the quilt's weight.
15) Go slowly! I like to pin as I go. Watch out for the pins on the edges holding your layers together! Don't sew through those--remove before your needle gets to them.
16) Once your binding is sewn on, trim any threads that are hanging off the binding or any backing fabric/batting that wasn't trimmed close enough before.
17) Use pins or hair clips to fold your binding back and prepare it for hand sewing. I like to do the hand sewing while watching TV with the blanket in my lap. When I do this and use pins, they poke my legs the whole time! They will work, but if you use hair clips, they won't poke you.
19) Take pictures of your awesome t-shirt quilt, post them, and leave a link in the comments so I can see your work!

Awesome job on the tutorial! I'm working on two quilts (for my cousins - twins)... since they both have SO MANY shirts from high school, the knot idea works so much better than free-motion quilting!
ReplyDeleteYour quilt is beautiful as well :-)
I just found your this tutorial from Pinterest! Yay, I have to make a KING size tee shirt quilt and this should make it go much easier. I must admit, I have been putting it off for the "interfacing" alone, but the cutting kind of intimidates me too. :(
ReplyDeleteI will send you a picture when I am done. :) Thank you.
that is THE WORST part of making a T-shirt quilt. . . it takes FORREEEVVEERRRRR to iron on all of the interfacing. . . UGHHHH. . .
ReplyDeleteI would LOVE to be able to make one without the interfacing. I could get so much more done so much faster!
Your tutorial is perfect. Very clear instructions and photos.
However. . . this won't work for me, because I have found that you MUST have the interfacing if you are going to do machine quilting. There is just no way to prevent the stretchy t-shirt knits from shifting underneath the needle when you go to free-motion quilt with your sewing machine and darning foot. UGHHH. . . why can't there be a simple solution???
I know it could be done if you tie the quilt, or you could even do "rag" style. . where the quilt is constructed Quilt-As-You-Go. . and the seams are on the outside. . . but I don't think this would work very well with a "tetris" style quilt.. . or a quilt that uses lots of little blocks of different sizes.
Anyway. . if anyone comes up with a solution to my problem I would appreciate the help!!!!! ;c)
Again, beautiful job on your tutorial and quilt. Thanks!!
I've seen some tutorials that used spray adhesives to attach the shirt to another layer for extra firmness. I may try that also!!
ReplyDelete